实现环境
如下图所示,使用Dynamips搭建网络环境,其中PC机使用本机与SW1桥接。
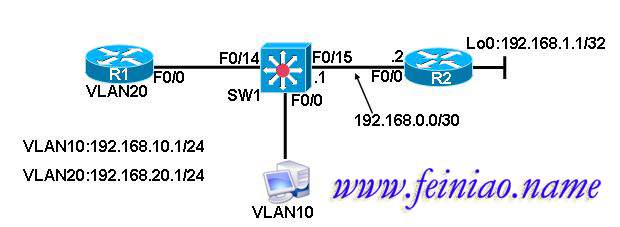
实验描述
在SW1上创建VLAN10和VLAN20,并将端口F0/0划分到VLAN10,将商品F0/14划分到VLAN20
在SW1上和R2上配置路由,使网络互通
在R1上配置DHCP,在SW1上配置DHCP中继,使PC机能自动获取到IP地址和默认网关。
在PC机上通够PING通R1和Lo0
实验配置
PC机使用路由模拟
R1上的配置
Router>en 进入特权模式
Router#conf t 进入全局模式
Router(config)#ho r1 更改设备名称
r1(config)#no ip do lo 关闭域名解析
r1(config)#lin 0 进入控制台
r1(config-line)#no exec-t 关闭超时
r1(config-line)#logg s 关闭日志同步
r1(config-line)#int f0/0 进入F0/0接口
r1(config-if)#ip add 192.168.20.1 255.255.255.0 配置IP和掩码
r1(config-if)#no shut 开启接口
r1(config-if)#exit 退回特权模式
r1(config)#ip route 0.0.0.0 0.0.0.0 192.168.20.254 配置默认路由
r1(config)#ip dhcp pool name 配置DHCP名字
r1(dhcp-config)#network 192.168.10.0 255.255.255.0 定义地址池
r1(dhcp-config)#default-router 192.168.10.254 定义默认网关
r1(dhcp-config)#exit 返回全局模式
r1(config)#
R2上的配置
Router>en 进入特权模式
Router#conf t 进入全局模式
Router(config)#ho r2 更改设备名称
r2(config)#no ip do lo 关闭域名解析
r2(config)#lin 0 进入控制台
r2(config-line)#no exec-t 关闭超时
r2(config-line)#logg s 关闭日志同步
r2(config-line)#int f0/0 进入F0/0接口
r2(config-if)#ip add 192.168.0.2 255.255.255.0 配置IP和掩码
r2(config-if)#no shut 开启接口
r2(config-if)#int lo0 进入回环口0
r2(config-if)#ip add 192.168.1.1 255.255.255.255 配置IP和掩码
r2(config-if)#exit 退回全局模式
r2(config)#ip route 0.0.0.0 0.0.0.0 192.168.0.1 配置默认路由
PC上的配置
Router>en 进入特权模式
Router#conf t 进入全局模式
Router(config)#ho pc 更改设备名称
pc(config)#no ip do lo 关闭域名解析
pc(config)#no ip routing 关闭路由功能
pc(config)#lin 0 进入控制台
pc(config-line)#no exec-t 关闭超时
pc(config-line)#logg s 关闭日志同步
pc(config-line)#int f0/0 进入F0/0接口
pc(config-if)#no shut 开启接口
SW1上的配置
Router>en 进入特权模式
Router#conf t 进入全局模式
Router(config)#ho sw1 更改设备名称
sw1(config)#no ip do lo 关闭域名解析
sw1(config)#lin 0 进入控制台
sw1(config-line)#no exec-t 关闭超时
sw1(config-line)#logg s 关闭日志同步
sw1(config-line)#exit 退回全局模式
sw1(config)#ip routing 开启路由功能
sw1(config)#end 返回特权模式
sw1#vlan da 进入VLAN配置模式
sw1(vlan)#vlan 10 添加VLAN10
VLAN 10 added:
Name: VLAN0010
sw1(vlan)#vlan 20 添加VLAN20
VLAN 20 added:
Name: VLAN0020
sw1(vlan)#exit 保存并退出
APPLY completed.
Exiting....
sw1#conf t 进入全局模式
sw1(config)#int f0/0 进入F0/0接口
sw1(config-if)#sw mode acc 配置成访问链路
sw1(config-if)#sw acc vlan 10 加入VLAN10
sw1(config-if)#int vlan 10 进入VLAN10
sw1(config-if)#ip add 192.168.10.254 255.255.255.0 配置IP和掩码
sw1(config-if)#ip helper-address 192.168.20.1 配置DHCP中继
sw1(config-if)#int f0/14 进入F0/14
sw1(config-if)#sw mode acc 配置成访问链路
sw1(config-if)#sw acc vlan 20 加入VLAN20
sw1(config-if)#int vlan 20 进入VLAN20
sw1(config-if)#ip add 192.168.20.254 255.255.255.0 配置IP和掩码
sw1(config-if)#int f0/15 进入F0/15
sw1(config-if)#no switchport 开启三层接口
sw1(config-if)#ip add 192.168.0.1 255.255.255.252 配置IP地址和掩码
sw1(config-if)#no shut 开启接口
sw1(config-if)#exit 退回特权模式
sw1(config)#ip route 192.168.1.1 255.255.255.255 192.168.0.2 配置静态路由
sw1(config)#
验证配置
pc(config-if)#ip add dhcp 使用DHCP获取地址
pc(config-if)#
*Mar 1 00:13:57.863: %DHCP-6-ADDRESS_ASSIGN: Interface FastEthernet0/0 assigned DHCP address 192.168.10.1, mask 255.255.255.0, hostname pc
pc(config-if)#end 返回特权模式
pc#ping 192.168.1.1
Type escape sequence to abort.
Sending 5, 100-byte ICMP Echos to 192.168.1.1, timeout is 2 seconds:
!!!!!
Success rate is 100 percent (5/5), round-trip min/avg/max = 48/68/120 ms
pc#
发表评论:
◎欢迎参与讨论,请在这里发表您的看法、交流您的观点。